Recipes: Easy Bacon Wrapped Asparagus Bundles

We like asparagus in our house. When it is in season we have it more often, but loved to have it every once in awhile even out of season. This is a super Easy Bacon Wrapped Asparagus Bundles recipe! It only requires 3 ingredients too!
If you like bacon and asparagus you will probably like this recipe! Our kids think this recipe is great. For another bacon wrapped asparagus bundles with more ingredients – Bacon Wrapped Asparagus Bundles.
Easy Bacon Wrapped Asparagus
This is a super Easy Bacon Wrapped Asparagus Bundles recipe! It only requires 3 ingredients too!Servings: 4 peopleIngredients
- 1 bundle Fresh Asparagus
- 12 oz Bacon Center cut is best
- 1/4 cup Italian Salad Dressing
Instructions
- Preheat the oven to 400 degrees.
- Rinse and trim the ends of the asparagus. Remove any hard stems on the asparagus stalks too. Generally, the smaller the asparagus stalk the better because it is more tender.
- Divide your asparagus up into equal piles (3 to 8 stalks). Pick the number of bundles you want to do and divide it up as equal as possible.
- Lay 1 asparagus bundle in the center of a slice of bacon. Wrap the bacon around the asparagus bundle and place on a broiler pan. Repeat this step until all your asparagus bundles are wrapped. If you have extra bacon you can cook that on the pan beside the asparagus bundles if you want.
- Sprinkle each bundle equally with Italian Salad Dressing.
- Bake for about 20 to 25 minutes or until the bacon is cooked.
Notes
GRILLING – You can also place these Bacon Wrapped Asparagus Bundles on the grill at your next cookout! Make sure not to put it too close to a really hot spot or open flame on the grill for a long period of time. It will usually take less time on the grill to cook these bundles. Once the asparagus looks like it is starting to wilt a little and the bacon is cooked these will be done.Recipes: Chicken Tomato Pasta

Chicken Tomato Pasta Dish
Another great meal made by my awesome husband. He came up with this pasta recipe one Sunday for lunch. The base is animal shaped pasta noodles (can you guess who picked out the noodles)?! Topped with chicken, tomatoes, bok choy, spinach, and mushrooms. It was a fresh and tasty combination perfect for dinner out on the deck with the family on a sunny Sunday afternoon.
Chicken Tomato Pasta Recipe:
- 1 lb Chicken Breasts (sliced, cooked, seasoned, and drained)
- 12 oz Pasta (we used Organic Vegetable Pasta in the shape of Animals)
- 1 large Tomato (or can of diced tomatoes)
- 1 cup Fresh Spinach
- 1 cup Fresh Bok Choy
- 1/2 cup Fresh Mushrooms
- 1 tablespoon Olive Oil
- 1/2 teaspoon Minced Garlic
- Optional – 1/2 small Onion
- Optional – 1/4 cup shredded Cheese
1. Slice the chicken in about 1 inch strips. Heat 1/2 tablespoon of Olive Oil in a frying pans on medium heat and add the minced garlic (and onion if using it). Cook over medium heat for 3 minutes. Add the chicken and stir gently as every couple minutes while working on the other steps.
2. Add water to a pot and turn it on medium-high until it is at a rolling boil and add the pasta. Cook the pasta per the directions on the package.
3. Slice up the vegetables into about 1/2 inch to 1 inch pieces (tomatoes, spinach, bok choy, mushrooms). Heat 1/2 tablespoon of olive oil in a pan over medium heat. Add the mushrooms and tomatoes cooking them for about 2 minutes. Add the spinach and bok choy, cooking for an additional 3 minutes or until the leaves are starting to wilt.
4. Scoop some pasta onto your plate. Top with the tomato and vegetable mixture. Add the chicken and a little more of the tomato and vegetable mixture. Optional: Garnish with sauteed bok choy centers and a sprinkle of shredded cheese.

Chicken Tomato Pasta with a Bok Choy garnish!
Recipes: Octopus Spaghetti

One of the Octopus Spaghetti pieces
Our family enjoys having fun in the kitchen. We have done this recipe a few times especially when the kids are a little younger. It was one of those days when we had spaghetti on the menu, but instead I decided to alter it to make it more fun for the kids. The normal spaghetti and meatballs for dinner turned into Octopus Spaghetti which included hotdogs instead of meatballs.
It really is easy. While the noodles were still hard I stuck them through pieces of hotdogs. The hotdogs cooked while the spaghetti noodles were boiling. I added a little bit of spaghetti sauce, a side dish or two (garlic bread and / or a fresh salad are good ones) and dinner is ready. The kids love it and enjoy helping with this recipe too.
Octopus Spaghetti Recipe:
- 1 package Hotdogs
- 40 Spaghetti Noodles
- 1 jar Spaghetti Marina Sauce (store bought or homemade)
Place a pot of water on the stove and begin heating it up until boiling. While you are waiting for your water to boil cut each of the 10 hotdogs into 4 equal pieces. Put 4 dry spaghetti noodles through each piece of hotdog (this allows you to have 4 octopus arms on each side of the hotdog, therefore giving you 8 octopus arms total). It may take a couple extra spaghetti noodles because you may break a couple when poking them through the hotdogs. Once the water is boiling place the hotdogs and noodles into your pot and boil until noodles are thoroughly cooked.
While the hotdogs and noodles are cooking place your spaghetti sauce into a smaller sauce pan and heat until it is hot. Place the hotdogs and noodles on your plate first and put the spaghetti sauce on top.
Our kids think the hotdogs and noodles tastes good even without the spaghetti sauce. You can do it either way. It is a fun meal, especially for the kids.

A pile of Octopus Spaghetti on that plate.

Spaghetti marina sauce added on top of the Octopus Spaghetti
Recipes: Beef Taco & Rice Casserole

My husband comes up with some delicious recipes. Sometimes he starts from scratch while other times he finds leftovers in the refrigerator that need to be used up and makes them into a delicious meal meal. On this particular day we had leftover rice from an earlier meal that week so he came up with this tasty Taco Rice Casserole. Add whatever toppings you like to this casserole and enjoy!
Taco Rice Casserole Recipe:
- 1 pound Ground Hamburger (cooked and drained)
- 1/4 small Onion
- 1 teaspoon Olive Oil
- 2 cups Rice (cooked)
- 1 pack Taco Seasoning
- 1 can regular diced Tomatoes
- 1 can diced Tomatoes with Chilies
- Topping Options (sour cream, shredded cheese, salsa, olives)
Saute the onion in Olive Oil for about 5 minutes. Add the ground hamburger to the onions, cook thoroughly, and drain the fat. Add the pack of taco seasoning according to directions. Cook the rice according to directions and drain. Add the 2 cans of diced tomatoes to the taco hamburger mixture and heat to a boil and simmer on low for 3 minutes. Add the pasta to the hamburger mixture and mix.
Pour the mixture into a greased casserole dish and cook on 350 degrees for 25 minutes or until heated through. Optional: The last five minutes add the 2 cups of corn chips and/or shredded cheese on top. Serve with taco toppings such as sour cream, shredded cheese, and salsa, olives, and fresh diced tomatoes.
Recipes: Cheesy Bacon Potatoes Bites

Cheesy Bacon Potato Bites
I try to keep potatoes on hand for a variety of family recipes. It is fun to try out some new recipes with the potatoes too. The Cheesy Bacon Potato Bites is one we tried a few months ago and our family liked it so much we have added several variations to this recipe. If we need to use up some potatoes or a simple side dish this is a good one for family meals.
Part of this recipe is with regular dairy cheese and the another part using soy cheese (dairy free cheese). If you have someone in your family that has a dairy allergy you could use this recipe to do the whole pan dairy free or part of it like we did for our family (depending on the intensity of the dairy reaction). It is a simple recipe that you can alter to suit your family.
Cheesy Baked Potatoes:
- 4 Potatoes (we used red potatoes this time)
- 2 tablespoons Olive Oil
- 1 tablespoon Garlic Salt (we like Lawry’s)
- 1/2 teaspoon Black Pepper
- 1 cup Shredded Cheese (we used Colby Jack and the orange cheese the right of the picture is actually Soy Cheese)
- 1/4 cup of Bacon Bits
1. Rinse the potatoes.
2. Slice the potatoes into 1/2 inch slices.
3. Preheat the oven to 400 degrees.
4. Spray the bottom of a 9×13 baking dish.
5. Place the potatoes in a single layer in your 9×13 dish. Brush each potato with olive oil.
6. Sprinkle the tops of the potatoes with garlic salt and black pepper. Bake at 400 degrees for 25 minutes.
7. Pull the potatoes out of the oven. Add the cheese and bacon to the tops of the potatoes. Bake for an additional 5 minutes.

Potatoes sliced, oiled, seasoned, and ready to go into the oven

Potatoes after being baked for 25 minutes. Time to add the toppings – cheese & bacon!

Cheese has been added and already melting because the potatoes are so hot! Next comes a layer of bacon, five more minutes in the oven, and it’s ready! As you can see from the picture you could make this a “dairy free” recipe if you use dairy free cheese such as soy.
Recipes: Red & Blue Patriotic Salad

Fresh Red & Blue Patriotic Salad
I have been enjoying the fresh salads lately with the warmer temperatures. The other day as I was looking through the refrigerator for lunch ideas and decided to use up some leftovers along with some fresh fruit and greens. The salad turned out delicious. It was cool and crispy with a touch of sweetness in every bite.
The recipe below is for a single serving, however, this would be a great one to make into a larger salad to share for the July 4th Holiday or really anytime throughout the hot summer season. Whether at a picnic, party, celebration, or any other event the salad is sure to be a hit. Plus it’s healthy, colorful, and delicious!
Red & Blue Patriotic Salad Recipe:
- 2 cups Fresh Romaine Lettuce
- 1/4 cup cut Fresh Strawberries
- 1/4 cup Fresh Blueberries
- 3 oz Sirloin Steak, slivered
- 1 tablespoon Walden Farms Raspberry Vinaigrette
Rinse the romaine lettuce, strawberries, and blueberries. Cut up the romaine lettuce (if not already done so). Place the romaine onto your plate or serving dish. Cut the strawberries into quarters and add them to the top of the romaine. Add the blueberries on top as well. Sliver your sirloin steak and place it on the bed of romaine. Sprinkle the Walden Farms Raspberry Viniagrette salad dressing over your salad, mix gently, and enjoy!
Optional: If you want to add a little bit of white to your Red & Blue salad to make it a Red, White, and Blue Salad I was suggest adding a sprinkling of cheese on top such as crumbled blue cheese, shredded parmesean, or mozzarella.
Total Calories: 333 | Total Net Carbs: 4.4

Fresh & Delicious!

Lunch is ready!
Recipes: Cashew Apple Chicken

Cashew Apple Chicken
I love weekends at home for many reasons. It is awesome spending some extra time with my family. During the week typically I do most of the cooking do to everyone’s schedule being a more crazy, however, on the weekends many times my husband will cook our family meal. He comes up with some of the most amazing and delicious dishes. It is so neat to watch him look in the fridge to see what we have or what needs used up then whipped together a new and tasty meal.
Our family enjoys chicken, apples, and cashews so this meal was a hit. I am so thankful for a husband who cooks. He has widen my recipe collections with the variety of dishes he pulls together. Yes, I am blessed!
Cashew Apple Chicken Recipe:
- 4 Chicken Breasts (boneless and skinless)
- 1/2 tablespoon Olive Oil
- 2 Apples, cut up in equal size pieces (we used granny smith because we had them in the fridge)
- 1 teaspoon Salt
- 1/4 teaspoon Pepper
- 1/4 teaspoon Cinnamon
- 1 tablespoon Maple Syrup
- 1 tablespoon Italian Dressing
- 1/4 cup Cashews
1. Mix together the salt, pepper, and cinnamon into a small bowl. Sprinkle the chicken breasts for a pinch of this mixture and set the remaining spice mixture aside.
2. Add the olive oil to a frying pan and allow to heat up using medium heat for about 1 minute. Add the chicken breasts to the pan and cook. Cook for 10 minutes on one side and turn to cook for an additional 10 minutes on the remaining side. The chicken should be a light brown on all sides. While the chicken is cooking on each side do steps 3 to 5.
3. Preheat oven to 350 degrees.
4. Grease a baking dish.
5. Dice up the apples and set aside.
6. Once the chicken is brown on all sides (see step 2) remove the chicken breasts from the pan and place them into the baking dish.
7. Add the Maple Syrup, Italian Seasoning, and spice mixture to the pan of oil and chicken juices. Heat over medium for about 1 minute. Add the diced apples and cashews. Continue to cook for 3 minutes stirring gently. Remove from heat and spoon the apple and cashew mixture equally over the chicken breasts.
8. Cover and bake at 350 degrees for 35 minutes.
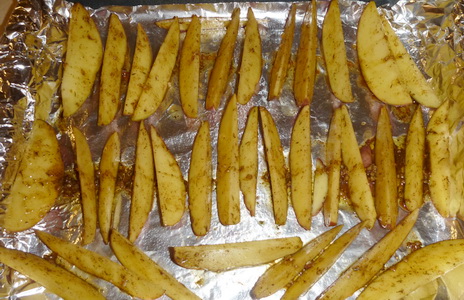
Recipes: Easy Potato Wedges
Crispy & Delicious Potato Wedges
Easy Potato Wedges Recipe:
- 4 Potatoes
- 1/4 cup Olive Oil
- 1/2 teaspoon Pepper
- 1/2 teaspoon Paprika
- 1 teaspoon Garlic Salt (we like Lawry’s Garlic Salt)
- Wash potatoes, cut into wedges.
- Place potatoes skin down in a baking dish.
- Mix the next 6 ingredients together and brush onto potatoes.
- Bake at 350 for 1 hour.
1. Preheat the oven to 350 degrees.
2. Wash the potatoes. Cut them into wedges. Place in baking dish.
3. Mix the olive oil, pepper, paprika, and garlic salt together and pour over the potatoes. Use a spoon to gently stir the potatoes so that they are evenly coated.
4. Bake for 40 minutes or until the potato wedges are cooked and tender.

Tray of Easy Potato Wedges
Recipes: Low Carb & Low Calorie Brownies (with Walnuts)

Low Carb & Low Calorie Brownie goodness
I am super excited to share this delicious and healthy Brownie Recipe with you. It is both low carb and low calorie if you are trying to eat healthier, but occasionally want chocolate. Sometimes even while you are trying to eat healthier you just want something sweet and chocolate. This recipe includes walnuts, but they can be omitted.
A friend shared this recipe with me a couple months ago. I have made these brownies several times. They are delicious especially if you have been cutting back on sugar already! I especially like to pull them out of the freezer for a cool tasty treat during those hot days, but really they good any time.
This recipe makes 32 individual brownies. I like to make a full batch which is a 9 x 13 baking dish and store the individual brownies in the freezer for the chocolate cravings or sweet snack. Yes, these take longer than the box brownies, but they are healthier for you too. They are rich and filled with chocolate goodness that hit the spot, but it won’t set you back if you are keeping track of your calories and carbs. Once this recipe is baked and cool it has a similar texture of a real brownie, but without the extra calories and carbs in each bite. If you are looking for a healthy brown alternative try this recipe!
Low Carb & Low Calorie Brownie Recipe (with Walnuts):
- 1 stick Butter or Margarine (room temperature)
- 2 cups Erythritol (powdered is best, but works with granulated too)
- 1 tablespoon Vanilla
- 4 Eggs (room temperature)
- 1/2 cup Cocoa Powder
- 1 teaspoon salt
- 4 oz Unsweetened Chocolate (melted)
- 2 cups Flax Seed Meal
- 1 tablespoon Baking Powder
- 1/3 cup Heavy Whipping Cream
- 2/3 cup Water
- 1 cup Artificial Sweetner
- 1 cup Walnuts (optional)
1. Preheat oven to 350 degrees and grease a 9 x 13 baking dish.
2. Cream butter or margarine until fluffy. Add the Erythritol and cream until fluffy (want a fluffy texture). If you use the Erythritol granulated it will not turn out as fluffy, but the brownies will still taste good (I have done it both ways).
3. Add the vanilla to the butter mixture. Beat the eggs into the mixture one at a time. Add salt and cocoa powder; beat well.
4. Add the melted unsweetened Chocolate and beat until fluffy.
5. Add the remaining ingredients and mix well. This recipes has the walnuts added, but they are optional.
6. Pour brownie batter into 9 x 13 baking dish. Bake for 35 minutes. Cool and cut into 32 squares.
These taste delicious fresh, cooled, or even frozen!
Total Calories: 113 Total Net Carbs: 1.19 Per Brownie (including walnuts)
Net Carbs is calculated by taking the Carbs minus the Fiber.
If you omit the walnuts the Total Calories: 88 Total Net Carbs: 0.94
The total calories and net carbs are based of the ingredients we used while cooking this recipe. It is good idea to calculate based of the specific brand and ingredients you are using in your recipe because it may vary slightly, but this will give you a good base guideline. As long as you use the ingredients listed above it should be fairly close.

Cutting the brownies into individual pieces to enjoy

Tried some for a few days then decided to see how they tasted from the freezer. They are awesome! These brownies contain walnuts, but you don’t have to add them!

Bagged and ready to go into the freezer!

2 fresh ones were eaten now the remaining 30 are bagged to be frozen!
Recipes: Bacon Wrapped Asparagus Bundles

Bacon Wrapped Asparagus
Our family enjoys fruits and vegetables. We like our produce with breakfast, take it in our lunches, and have it at dinner too. Asparagus is one we really like and we love finding new ways to cook it. Whether it is baked or grilled these Bacon Wrapped Asparagus Bundles come out very tasty. It is easy to assemble and the kids love eating this delicious vegetable.
Bacon Wrapped Asparagus Bundles Recipe:
- 1 Bundle of Fresh Asparagus
- 12 oz package Bacon (we like the center cut with more meat)
- Dash of Salt
- Dash of Pepper
- 1/4 cup Brown Sugar
- 1 tablespoon Butter or Margarine, melted
- Sesame Seeds, optional
1. Preheat the oven to 400 degrees.
2. Rinse and trim the ends of the asparagus. Remove any hard stems on the asparagus stalks too. Generally, the smaller the asparagus stalk the better because it is more tender.
3. Divide your asparagus up into equal piles (3 to 8 stalks). In these pictures we divided our asparagus up into 4 bundles (one for each family member). We have done smaller bundles too. Pick the number of bundles you want to do and divide it up as equal as possible.
4. Lay 1 asparagus bundle in the center of a slice of bacon. Wrap the bacon around the asparagus bundle and place on a broiler pan. Repeat this step until all your asparagus bundles are wrapped. If you have extra bacon you can cook that on the pan beside the asparagus bundles if you want.
5. Sprinkle each bundle with a dash of salt and pepper. Mix the brown sugar and melted butter or margarine together and pour over the asparagus bundles. Top with sesame seeds.
5. Bake for about 20 to 25 minutes or until the bacon is cooked.*
*GRILLING – You can also place these Bacon Wrapped Asparagus Bundles on the grill at your next cookout! Make sure not to put it too close to a really hot spot or open flame on the grill for a long period of time. It will usually take less time on the grill to cook these bundles. Once the asparagus looks like it is started to wilt a little and the bacon is cooked these will be done.
Sometimes we make up a big tray of the Bacon Wrapped Asparagus Bundles because the kids love them re-heated as well.

Ready to bake and eat!

Delicious!


